前言
這篇文章記錄了我在寫組合語言與系統程式這門課的期末 project 時的過程和期間碰到的問題與解決辦法。內容主要為 FFmpeg 的 libavcodec、Qt 的 QMediaPlayer、QThread 等,還有一些關於用 Visual C++和 Assembly 對接的知識。
這次選擇的題目是 ASCII Animation Player,希望能達成
從檔案系統讀取視訊檔案並解碼
把解碼的圖像資料轉換成 ASCII Art
即時播放在 Console,並能和音訊同步
同時開啟一個播放原影片的視窗當作對照組
這邊我原本打算只用 FFmpeg 做音視訊解碼,再同時送給 MediaPlayer 和做 ASCII 轉換的執行序,但後來時間不太夠,就直接讓播影片的對照組用 QMediaPlayer 簡單了事了。我自己覺得非常可惜。
正文
視訊解碼
libavcodec 架構
來源
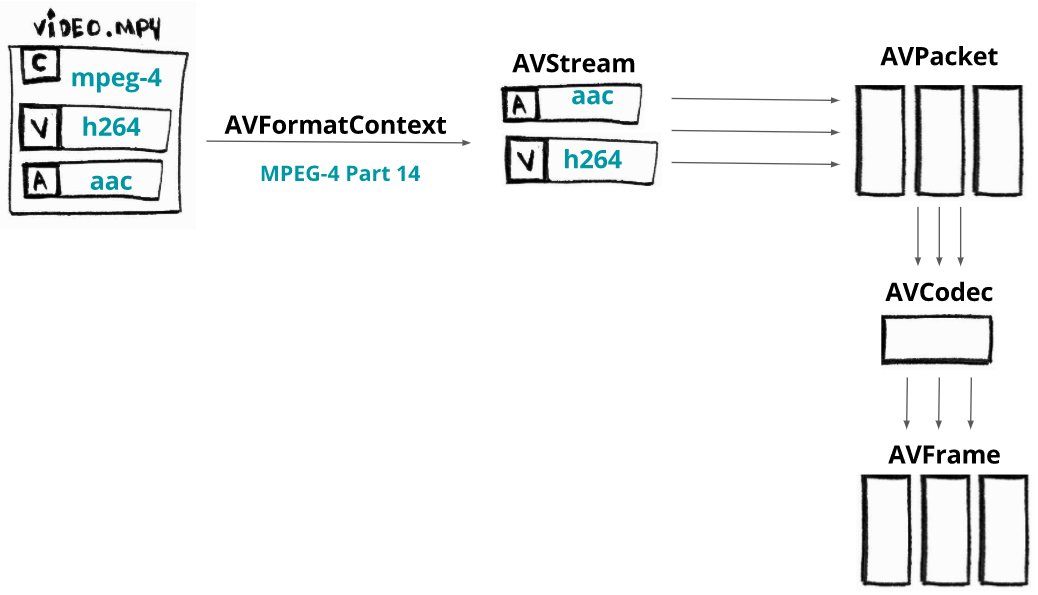
上圖可以看出來,一個影片可以分為 format context 和音訊與視訊串流。經由 format context 可以取得音視訊的串流,再由串流取得編碼資訊,最後用編碼資訊取得解碼器。有了解碼器後就可以用 AVPacket 的結構向 format context 取得編碼過的資料並餵給解碼器解碼,再用 AVFrame 的結構把解碼後的資料存起來。
解碼流程實作
我們製作的過程比較像是隕石開發,沒有先做好完善的規劃,但是我還是有設計了一些類別用來處理解碼,下面是一些我寫的爛 code 的節錄。
ffmpeg/video_decoder.h
1 2 3 4 5 6 7 8 9 10 11 12 13 14 15 16 17 18 19 20 21 22 23 24 #pragma once #include <string> #include "stream_wrapper.h" extern "C" {#include <libavformat/avformat.h> } class VideoDecoder { public : VideoDecoder (std::string video_path); ~VideoDecoder (); AVFrame* next_frame () ; int get_video_width () int get_video_height () AVRational get_video_timebase () ; private : AVFormatContext* format_context; StreamWrapper video; StreamWrapper audio; AVPacket* temp_packet; AVFrame* current_frame; };
ffmpeg/video_decoder.cpp
1 2 3 4 5 6 7 8 9 10 11 12 13 14 15 16 17 18 19 20 21 22 23 24 25 26 27 28 29 30 31 32 33 34 35 36 37 38 39 40 41 42 43 44 45 46 47 48 49 50 51 52 53 54 55 56 #include "video_decoder.h" #include "stream_wrapper.h" #include <exception> #include <stdio.h> VideoDecoder::VideoDecoder (std::string video_path) { format_context = avformat_alloc_context (); if (avformat_open_input (&format_context, video_path.c_str (), nullptr , nullptr ) != 0 ) throw std::exception ("Encounter error while opening video file!" ); for (size_t i = 0 ; i < format_context->nb_streams; i++) { AVStream* in_stream = format_context->streams[i]; AVCodecParameters* code_par = in_stream->codecpar; if (code_par->codec_type == AVMEDIA_TYPE_VIDEO) video = StreamWrapper (in_stream, code_par); else if (code_par->codec_type == AVMEDIA_TYPE_AUDIO) audio = StreamWrapper (in_stream, code_par); } video.load_codec_context (); audio.load_codec_context (); temp_packet = nullptr ; current_frame = nullptr ; } VideoDecoder::~VideoDecoder () { avformat_close_input (&format_context); av_packet_free (&temp_packet); av_frame_free (¤t_frame); } AVFrame* VideoDecoder::next_frame () { if (temp_packet == nullptr ) { temp_packet = av_packet_alloc (); current_frame = av_frame_alloc (); } else { av_packet_unref (temp_packet); av_frame_unref (current_frame); } while (av_read_frame (format_context, temp_packet) >= 0 ) { AVCodecContext* codec_context; if (temp_packet->stream_index == video.get_stream ()->index) codec_context = video.get_codec_context (); else if (temp_packet->stream_index == audio.get_stream ()->index) codec_context = audio.get_codec_context (); else continue ; avcodec_send_packet (codec_context, temp_packet); avcodec_receive_frame (codec_context, current_frame); return current_frame; } current_frame = nullptr ; return current_frame; }
ffmpeg/stream_wrapper.h
1 2 3 4 5 6 7 8 9 10 11 12 13 14 15 16 17 18 19 20 #pragma once extern "C" {#include <libavformat/avformat.h> } class StreamWrapper { public : StreamWrapper (); ~StreamWrapper (); StreamWrapper (AVStream* stream, AVCodecParameters* codec_par); void load_codec_context () AVCodecContext* get_codec_context () ; AVStream* get_stream () ; private : AVStream* stream; AVCodecParameters* codec_par; AVCodec* codec; AVCodecContext* codec_context; };
ffmpeg/stream_wrapper.cpp
1 2 3 4 5 6 7 8 9 10 11 12 13 14 15 16 17 18 19 20 21 22 23 24 25 26 27 28 29 30 31 32 33 34 35 36 37 #include "stream_wrapper.h" #include <exception> StreamWrapper::StreamWrapper () { } StreamWrapper::~StreamWrapper () { avcodec_free_context (&codec_context); } StreamWrapper::StreamWrapper (AVStream* stream, AVCodecParameters* codec_par) { this ->stream = stream; this ->codec_par = codec_par; codec = avcodec_find_decoder (codec_par->codec_id); if (!codec) throw std::exception ("Unsupported video codec!" ); codec_context = nullptr ; } void StreamWrapper::load_codec_context () codec_context = avcodec_alloc_context3 (codec); if (!codec_context) throw std::exception ("Failed to allocated memory for AVCodecContext." ); if (avcodec_parameters_to_context (codec_context, codec_par) < 0 ) throw std::exception ("Failed to copy codec params to codec context." ); if (avcodec_open2 (codec_context, codec, nullptr ) < 0 ) throw std::exception ("Encounter error while trying open context." ); } AVCodecContext* StreamWrapper::get_codec_context () return codec_context; } AVStream* StreamWrapper::get_stream () return stream; }
之後在使用上流程會輕鬆很多,大部分麻煩的處理都包裝在 class 裡面了。
舉個簡單的使用範例:
1
2
3
4
5
6
7
8
9
10
VideoDecoder video_decoder = VideoDecoder (file_path); AVFrame* frame = video_decoder.next_frame (); while (frame != nullptr ) { if (frame->pict_type != AV_PICTURE_TYPE_NONE) { } frame = video_decoder.next_frame (); }
將圖像轉換為 ASCII Art
Microsoft x64 calling convention
由於轉換明度為 ASCII 的程式碼是用 Assembly 寫的,我們就要注意 C++ 能不能正常的呼叫 Assembly 寫的 procedure。為此,我們除了要設定 IDE 在編譯時的行為,還必須了解 C++ 中函式呼叫是如何傳遞參數的。
我們這次用的是 MSVC v142,calling convention 使用預設的__cdecl,所以我是翻微軟的文件來看,下面簡述一下重點。
眾所周知,參數在傳遞的時候通常是從最後一個參數開始設定再一路向前,這邊也一樣。
傳遞參數依序使用 RCX、RDX、R8、R9,超過的部分就放進 Stack。
浮點數在傳遞時依序使用 XMM0、XMM1、XMM2、XMM3,超過的部分放進 Stack。
如果同時傳遞一般參數和浮點數,會交錯使用
void foo(int a, float b, int c, float d)RCX => a, XMM1 => b, R8 => c, XMM3 => d
放進 stack 的參數從左邊數來第一個應該會在[rbp+30h](如果 callee 有做 function prolog 的話),接下來的應該是[rbp+38h],以此類推。
來源
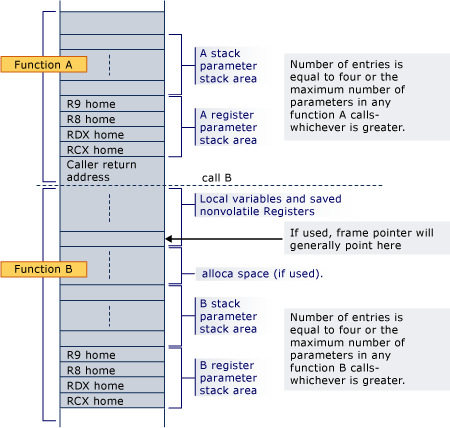
這張圖可以看出來,Compiler 會先處理要 push 到 stack 上面的參數,push 完後在呼叫前把 RCX、RDX、R8、R9 放到 stack 上(用來還原這四個暫存器的狀態)。
第一個在 stack 上的參數之所以會在[rbp+30h]可以由上圖算出來。
假設我們的 procedure 長這樣:
1
2
3
4
5
6
foo PROTO push rbp mov rbp, rsp ... leave ret
由於我們把RBP指向 stack 的頂端了,剛好建出一個 procedure 的 stack frame,[rbp]會是 caller 的RBP,[rbp+8h]會是return address(指向 caller 的 code 段),接下來四個依序是 caller 保存的RCX、RDX、R8、R9([rbp+10h]、[rbp+18h]、[rbp+20h]、[rbp+28h]),再上面就會是傳進來的參數,所以會是[rbp+30h]。
用 Assembly 轉換明度為 ASCII Art
第一個問題是要如何讓 C++可以呼叫 Assembly 的 procedure。解決方法其實很簡單,只要用extern "C" 宣告過函式 prototype 就可以用了(前提是 linker 設定正確)。
不知道如何設定可以參考看看這本放在 GitHub 的原文書。Appendix B 和 Appendix E 分別是環境安裝和呼叫方法(GitHub 連結 )。
transform.h
1 2 #pragma once extern "C" void transform (unsigned char *, unsigned char *, unsigned int , unsigned int , int )
簡單的使用範例,需要注意的是影片的顏色編碼,下面的 code 是以 YUV 格式寫的,所以送入的資料是frame->data[0],對應到 Y 的部分,也就是明度。之後只要根據明度大小決定要用哪個 ASCII 就行了。
1 2 3 4 5 6 7 8 9 10 11 12 13 14 15 16 17 18 19 20 #include <transfrom.h> ... int main () VideoDecoder video_decoder = VideoDecoder (file_path); AVFrame* frame = video_decoder.next_frame (); unsigned char * arr = nullptr ; while (frame != nullptr ) { if (frame->pict_type != AV_PICTURE_TYPE_NONE && position <= play_time) { if (arr == nullptr ) arr = new unsigned char [(long long )frame->height * (frame->width + 1 )](); transform (frame->data[0 ], arr, frame->width, frame->height, frame->linesize[0 ]); std::cout << arr; } frame = video_decoder.next_frame (); } delete [] arr; }
以下是簡單的明度轉 ASCII 程式碼實作。
利用傳入的 image raw data(這裡傳入的是 YUV 的 Y,即明度),轉換成 ASCII,並把轉換後的結果寫到 C++ 已經分配好的 Heap 空間內。
transform.asm
1
2
3
4
5
6
7
8
9
10
11
12
13
14
15
16
17
18
19
20
21
22
23
24
25
26
27
28
29
30
31
32
33
34
35
36
37
38
39
40
41
42
43
44
45
46
47
48
49
50
51
52
53
54
55
56
57
58
59
60
61
62
63
64
65
66
67
68
69
70
71
72
73
74
75
76
77
78
79
80
81
82
83
84
85
86
87
88
89
90
91
92
93
94
transform PROTO ; arguments ; rcx: BYTE PTR image raw data pointer ; rdx: BYTE PTR ascii frame data pointer ; r8: DWORD frame width ; r9: DWORD frame height ; rbp+30h: DWORD image raw data linesize ; this procedure modify rdi's byte array as ascii frame data .CODE transform PROC push rbp mov rbp, rsp push rbx push rsi push rdi push r10 mov rsi, rcx mov rdi, rdx mov rcx, r9 L1: push rcx mov rcx, r8 L2: mov bl, [rsi] cmp bl, 47 jb L4 cmp bl, 70 jb L5 cmp bl, 93 jb L6 cmp bl, 116 jb L7 cmp bl, 139 jb L8 cmp bl, 162 jb L9 cmp bl, 185 jb L10 cmp bl, 208 jb L11 cmp bl, 231 jb L12 cmp bl, 255 jbe L13 L4: mov BYTE PTR [rdi], ' ' jmp L14 L5: mov BYTE PTR [rdi], '.' jmp L14 L6: mov BYTE PTR [rdi], ':' jmp L14 L7: mov BYTE PTR [rdi], '!' jmp L14 L8: mov BYTE PTR [rdi], '+' jmp L14 L9: mov BYTE PTR [rdi], '*' jmp L14 L10: mov BYTE PTR [rdi], 'e' jmp L14 L11: mov BYTE PTR [rdi], '$' jmp L14 L12: mov BYTE PTR [rdi], '@' jmp L14 L13: mov BYTE PTR [rdi], '8' jmp L14 L14: inc rdi inc rsi loop L2 mov BYTE PTR [rdi], 0Ah inc rdi movsxd r10, SDWORD PTR [rbp+30h] sub r10,r8 add rsi, r10 pop rcx dec rcx ; loop can only do small jump jne L1 ; we need to use this replace loop pop r10 pop rdi pop rsi pop rbx leave ret transform ENDP END
利用這種手刻的方式應該是很接近查表的速度,如果用div來算各 ASCII 之間的範圍再到 ASCII array 上面取反而跑得慢很多。這次的專案是邊解碼並轉換成 ASCII 邊播放,沒有先算完存起來,所以採用跑比較快的方法,避免程式跑不夠快需要 drop frame。
播放 ASCII Animation
要播放 ASCII animation 並不複雜,由於上面的transform已經把資料轉換成 ASCII,已經可以直接播放了。不過經過測試,如果要清屏再輸出新的一幀會跑得非常慢,而且閃屏嚴重。後來找到的做法是用 ANSI 控制碼把游標移到最左上方後直接輸出。輸出內容會蓋掉原本螢幕上的文字,可以達到相同的目的。另外,為了要控制字體大小還有主控台的文字行列數,我們也必須直接操作控制台或是用虛擬主控台給的方法。由於虛擬主控台不能控制所有的內容,這裡大多是用windows.h給的函式來操作主控台。
虛擬主控台的支援,微軟在 Windows 10 後某版才加入,可參考這篇文章
我寫了一個 class 裡面用來集成一些關於主控台的操作
console/console_controller.h
1 2 3 4 5 6 7 8 9 10 11 12 13 14 #pragma once #include <Windows.h> class ConsoleController { public : ConsoleController (); void top () void set_console_mode () void set_console_font () void set_console_screen_buffer (short width, short height) private : HANDLE stdout_handle; };
console/console_controller.cpp
1 2 3 4 5 6 7 8 9 10 11 12 13 14 15 16 17 18 19 20 21 22 23 24 25 26 27 28 29 30 31 32 33 34 35 36 37 38 39 40 41 42 43 44 45 46 47 48 49 50 51 52 53 54 #include "console_controller.h" #include <iostream> ConsoleController::ConsoleController () { stdout_handle = GetStdHandle (STD_OUTPUT_HANDLE); } void ConsoleController::top () std::cout << "\x1B[H" ; } void ConsoleController::set_console_mode () DWORD mode = 0 ; GetConsoleMode (stdout_handle, &mode); mode = mode | ENABLE_VIRTUAL_TERMINAL_PROCESSING; SetConsoleMode (stdout_handle, mode); } void ConsoleController::set_console_font () CONSOLE_FONT_INFOEX cfi; cfi.cbSize = sizeof (cfi); GetCurrentConsoleFontEx (stdout_handle, FALSE, &cfi); cfi.dwFontSize.Y = 1 ; std::mbstowcs (cfi.FaceName, "MS Gothic" , 32 ); cfi.FontWeight = 700 ; SetCurrentConsoleFontEx (stdout_handle, FALSE, &cfi); } void ConsoleController::set_console_screen_buffer (short width, short height) CONSOLE_SCREEN_BUFFER_INFOEX csbi; csbi.cbSize = sizeof (csbi); GetConsoleScreenBufferInfoEx (stdout_handle, &csbi); csbi.dwSize.X = width; csbi.dwSize.Y = height; csbi.srWindow.Left = 0 ; csbi.srWindow.Top = 0 ; csbi.dwMaximumWindowSize.X = width; csbi.dwMaximumWindowSize.Y = height; SetConsoleScreenBufferInfoEx (stdout_handle, &csbi); COORD screen_buffer_size = { width, height }; SetConsoleScreenBufferSize (stdout_handle, screen_buffer_size); SMALL_RECT console_window = {0 , 0 , width-1 , height-1 }; SetConsoleWindowInfo (stdout_handle, TRUE, &console_window); }
補充幾個可能看不懂的地方,top()其實就是把游標移到最左上方,"\x1B[H"就是ESC[H,是 ANSI 用來把游標移到開頭的控制碼。set_console_mode()是設定控制台的模式,這裡開啟終端機的虛擬主控台模式,才能支援上面的 ANSI 控制碼。set_console_font()設定字型大小到最小(其實已經突破系統限制了,可能不是每台電腦都行),並且把字型改成 MS Gothic且粗體(這字型粗體時剛好是 1:1)。set_console_screen_buffer()設定主控台的螢幕緩衝區大小,這裡設定成影片的寬高,剛好可以滿幅顯示,除此之外,還要設定主控台視窗的大小,這裡把它設為寬高各-1,最後出來的大小剛好可以塞下上面的螢幕緩衝區。
這些關於主控台設定的 struct,很多都要先設定過cbSize才能正常使用,我也不知道真正的確切原因。有些有被寫在官方的文件上,不過實測後發現就算官方文件沒寫這函式要先設定cbSize,沒設定還是無法正常使用。
再來只要考慮什麼時候要讓下一個 frame 播放即可。最直覺的方式是直接用sleep讓執行序暫停1/fps的時間,但若仔細想過以後就會發現程式執行也是會佔時間的,特別是解碼和轉換的操作,因此這個方法會造成很嚴重的播放延遲。
正確的想法是要根據該 frame 本身應該出現的時間讓它出現,在此必須介紹一下pts的概念。pts直覺來說是 frame 在影片時間軸上面的時間戳,所以我們只要用pts來決定frame的播放時間即可。更多相關的內容就留到下面的同步章節再講。
播放音視訊
為了降低工作量,直接使用 QMediaPlayer 來處理音視訊的播放,就不用 FFmpeg 解碼完的資料了。要使用 Qt 提供的內容,除了要下載 Qt 以外還要做點處理才能在 Visual Studio 的專案中使用。
Qt 安裝注意事項
在執行 Online Intaller 時,選擇 Qt 版本時我們選用Qt 6.2.2 MSVC,來確保可以支援 Visual Studio (MinGW 的環境我沒測過就是),安裝時要記得把Additional Library裝上,之後在使用特定模組時才不會發生沒有安裝的慘況(或是可以到時再補安裝)。我們這次用到的Qt Multimedia就是Additional Library的一部分。安裝完後開啟 Visual Studio,還要再安裝Qt VS Tools的Extension,Visual Studio 才能正常管理 Qt 專案。
Qt Application
在程式的進入點,要實體化一個QApplication物件,後續才能使用大多 Qt 的功能。
1 2 3 4 5 6 7 8 #include <QtWidgets/QApplication> int main (int argc, char *argv[]) QApplication a (argc, argv) ; ... return a.exec (); }
最基本的範例長這樣,接下要做的就是建立播放影片的視窗,並設定播放影片的設定。
1 2 3 4 5 6 7 8 9 10 11 12 13 14 #include <QtWidgets/QApplication> #include <QVideoWidget> #include <iostream> int main (int argc, char *argv[]) QApplication a (argc, argv) ; std::cout << "Enter an video file path:" << std::endl; std::string file_path; std::cin >> file_path; QVideoWidget video_widget; video_widget.show (); return a.exec (); }
先從使用者輸入把要播放的影片檔案路徑讀進來,之後再開啟影片播放的視窗。需要注意的是 Qt 的視窗一定要都寫在主線程中,不然會出狀況。同時我們也要注意在主線程中不能有 Blocking 的操作,否則會造成程式假死(視窗完全沒反應,無法操作互動)。
下面我們就要用 QMediaPlayer 來播放影片並且在 QVideoWidget 上顯示。
1 2 3 4 5 6 7 8 9 10 11 12 13 14 15 16 17 18 19 20 21 22 23 24 25 #include <QtWidgets/QApplication> #include <QVideoWidget> #include <iostream> #include <QMediaPlayer> #include <QAudioOutput> #include <QMediaDevices> #include <QAudioDevice> int main (int argc, char *argv[]) QApplication a (argc, argv) ; std::cout << "Enter an video file path:" << std::endl; std::string file_path; std::cin >> file_path; QVideoWidget video_widget; video_widget.show (); QMediaPlayer player; QAudioOutput audio_output; audio_output.setDevice (QMediaDevices::defaultAudioOutput ()); player.setSource (QUrl::fromLocalFile (file_path.c_str ())); player.setVideoOutput (&video_widget); player.setAudioOutput (&audio_output); player.play (); return a.exec (); }
短短幾行就可以寫一個最簡單的影片播放了,非常方便,省下了手刻的時間,如果連影片播放都手刻人就要沒了。
差不多到了最後階段了,這章節的內容著重在同步 MediaPlayer 和 AsciiPlayer 的播放進度,同時因為 AsciiPlayer 會阻塞線程,我們必須把它搬到別的執行序裡面跑,再想辦法和影片播放的時間同步。
AsciiPlayerThread
這邊設計一個 AsciiPlayerThread 的類別來跑 ASCII Animation,實作的方式是用QThread,然後用slot的方式讓外界有辦法把播放的時間傳進來。
player/ascii_player_thread.h
1 2 3 4 5 6 7 8 9 10 11 12 13 14 15 16 #pragma once #include <QThread> class AsciiPlayerThread : public QThread{ Q_OBJECT public : AsciiPlayerThread (); AsciiPlayerThread (std::string file_path); void run () public slots: void setPosition (qint64 position) private : std::string file_path; qint64 position; };
我們的程式要覆寫掉run(),這個函式是執行序執行時的主函式。public slots裡面定義的是 Qt 的slot,可以用信號傳遞的方式把值傳進來,關於信號傳遞的方式,可以參考Qt 文件
player/ascii_player_thread.cpp
1 2 3 4 5 6 7 8 9 10 11 12 13 14 15 16 17 18 19 20 21 22 23 24 25 26 27 28 29 30 31 32 33 34 35 36 37 38 39 40 41 42 43 44 45 46 47 48 49 50 51 52 53 54 55 56 57 58 #include "ascii_player_thread.h" #include <iostream> #include "../ffmpeg/video_decoder.h" #include "../console/console_controller.h" #include "../transform.h" #include "../utils.h" #include <QThread> AsciiPlayerThread::AsciiPlayerThread () { } AsciiPlayerThread::AsciiPlayerThread (std::string file_path) { this ->file_path = file_path; this ->position = 0 ; } void AsciiPlayerThread::run () char * buf = new char [1024 * 256 ]; setbuf (stdout, buf); VideoDecoder video_decoder = VideoDecoder (file_path); ConsoleController console_controller; console_controller.set_console_mode (); console_controller.set_console_font (); console_controller.set_console_screen_buffer (video_decoder.get_video_width (), video_decoder.get_video_height ()); AVFrame* frame = video_decoder.next_frame (); unsigned char * arr = nullptr ; AVRational timebase_rational = video_decoder.get_video_timebase (); float timebase = (float )timebase_rational.num / (float )timebase_rational.den; while (frame != nullptr ) { float play_time = frame->pts * timebase * 1000 ; if (frame->pict_type != AV_PICTURE_TYPE_NONE && position <= play_time) { int height = frame->height; int width = frame->width; if (arr == nullptr ) arr = new unsigned char [(long long )height * (width + 1 )](); transform (frame->data[0 ], arr, width, height, frame->linesize[0 ]); wait_until_smaller (play_time - 150 , &position); std::cout << arr; console_controller.top (); } frame = video_decoder.next_frame (); } delete [] arr; delete [] buf; } void AsciiPlayerThread::setPosition (qint64 position) this ->position = position; }
因為我們程式是多線程的,其實position的 property 可能會隨時改變(被其他執行序呼叫setPosition),因此在寫程式的時候要考慮position可能會改變的狀況。例如跑完transform可能已經過了幾 ms,剛好更新了 position 的值,原本position < play_time就變成position > play_time。 如果不希望發生同時存取的狀況,最好設個互斥鎖之類的。
這裡的想法是當讀取的 frame 已經超過應該播放的時間,就直接跳過去讀取下一個 frame,如果沒有超過,就拿去餵給 Assembly 轉成 ASCII 然後在該播的時間顯示。實作是利用外部傳進來的影片播放時間(position)去對pts達成同步,play_time就是該 frame 應該要播放的時間(ms)。
這邊先為timebase還有pts舉個例子
1
2
3
4
5
6
7
8
9
10
11
12
fps = 30 timebase = 1/15360 frame 1 pts = 0 frame 2 pts = 512 frame 3 pts = 1024 ... frame 30 pts = 15360
從上面可以看出把timebase * pts即為該 frame 要播放的秒數,將它乘上 1000 就可以換算成 ms 和position做比較。這就是play_time的用意。
補充一下get_video_timebase()的實作
1
2
3
4
AVRational VideoDecoder::get_video_timebase () return video.get_stream ()->time_base; }
要留意的是 stream 的 timebase 和 codec 的 timebase 不一定相同,在使用上要根據情況變換。
再來是wait_until_smaller,這個函式的作用是等待直到play_time-150小於position。原本有用過msleep來實作,但是由於執行序繼續執行的時間很不穩定,而且一定會偏晚,後來嘗試使用while(play_time-150 > position);的空轉迴圈來代替,效果不錯,但是 compiler 開了 O2 以後就把這段直接優化掉了,只好改成用 Assembly 去做相同的功能。
以下是wait_until_smaller的實作
utils.asm
1
2
3
4
5
6
7
8
9
10
11
12
13
14
15
16
17
18
19
20
wait_until_smaller PROTO ; arguments ; xmm0: REAL4 a REAL4 variable need to be compared ; rdx: SQWORD PTR a SQWORD pointer which value be pointed would increase ; this procedure would block the thread until the condition is fulfilled ; Caution: it may cause the thread is blocked by a infinite loop .CODE wait_until_smaller PROC push rbp mov rbp, rsp compare: cvtsi2ss xmm1, SQWORD PTR [rdx] ; convert rdx to REAL4 type and store it in xmm1 comiss xmm0,xmm1 ; compare xmm0 with xmm1 jbe fufilled ; jump to fufilled if xmm0 <= xmm1 jmp compare ; jump to compare if xmm0 > xmm1 fufilled: leave ret wait_until_smaller ENDP END
註解寫得很清楚,其實就只是一直重複做比較直到條件滿足而已。跟原本的空轉迴圈是一樣的效果。
以上全部綜合起來,就完成和position做影片同步了
回到主線程,我們要想個辦法把影片的播放時間傳給正在播放 ASCII Animation 的執行序。由於我們已經留好一個slot用來設定position了,在主線程就只要把signal綁定上去就好。
main.cpp
1 2 3 4 5 6 7 8 9 10 11 12 13 14 15 16 17 18 19 20 21 22 23 24 25 26 27 28 29 #include <QtWidgets/QApplication> #include "player/ascii_player_thread.h" #include <QVideoWidget> #include <iostream> #include <QMediaPlayer> #include <QAudioOutput> #include <QMediaDevices> #include <QAudioDevice> int main (int argc, char *argv[]) QApplication a (argc, argv) ; std::cout << "Enter an video file path:" << std::endl; std::string file_path; std::cin >> file_path; QVideoWidget video_widget; video_widget.show (); AsciiPlayerThread ascii_player_thread (file_path) ; QMediaPlayer player; QAudioOutput audio_output; audio_output.setDevice (QMediaDevices::defaultAudioOutput ()); player.setSource (QUrl::fromLocalFile (file_path.c_str ())); player.setVideoOutput (&video_widget); player.setAudioOutput (&audio_output); ascii_player_thread.start (); QObject::connect (&player, &QMediaPlayer::positionChanged, &ascii_player_thread, &AsciiPlayerThread::setPosition); player.play (); return a.exec (); }
因為QThread有繼承QObject,所以可用QObject::connect來綁定positionChanged的signal到setPosition的slot上面。綁定過後,只要positionChanged的signal被送出,setPosition就會將收到的position拿來更新AsciiPlayerThread的position的值。
自此就完成了兩者的同步。
一些未解決或不知道詳細原因的 bug
播放時可能會觸發系統音效
經過幾次測試,大概整理一下觸發系統音效的情況
ASCII Animation 畫面會頓一下
時間都很短
目前猜測是用msleep或是有 blocking 操作的時候,作業系統認為執行序當掉了,因此發出系統音效。這個問題不是每次都會發生,到現在還沒解決。
設定的字體在不同電腦上可能無法正常運作
根據微軟給的文件 ,一開始我使用的Lucida Console應該是 Windows 10 的電腦上都有。我自己測試的時候卻發現只有筆電的主控台可以選這個字體,桌機的就只能選其他的少少幾個。所以後來改用兩個裝置都有的MS Gothic,希望在各裝置的相容性會好一點。
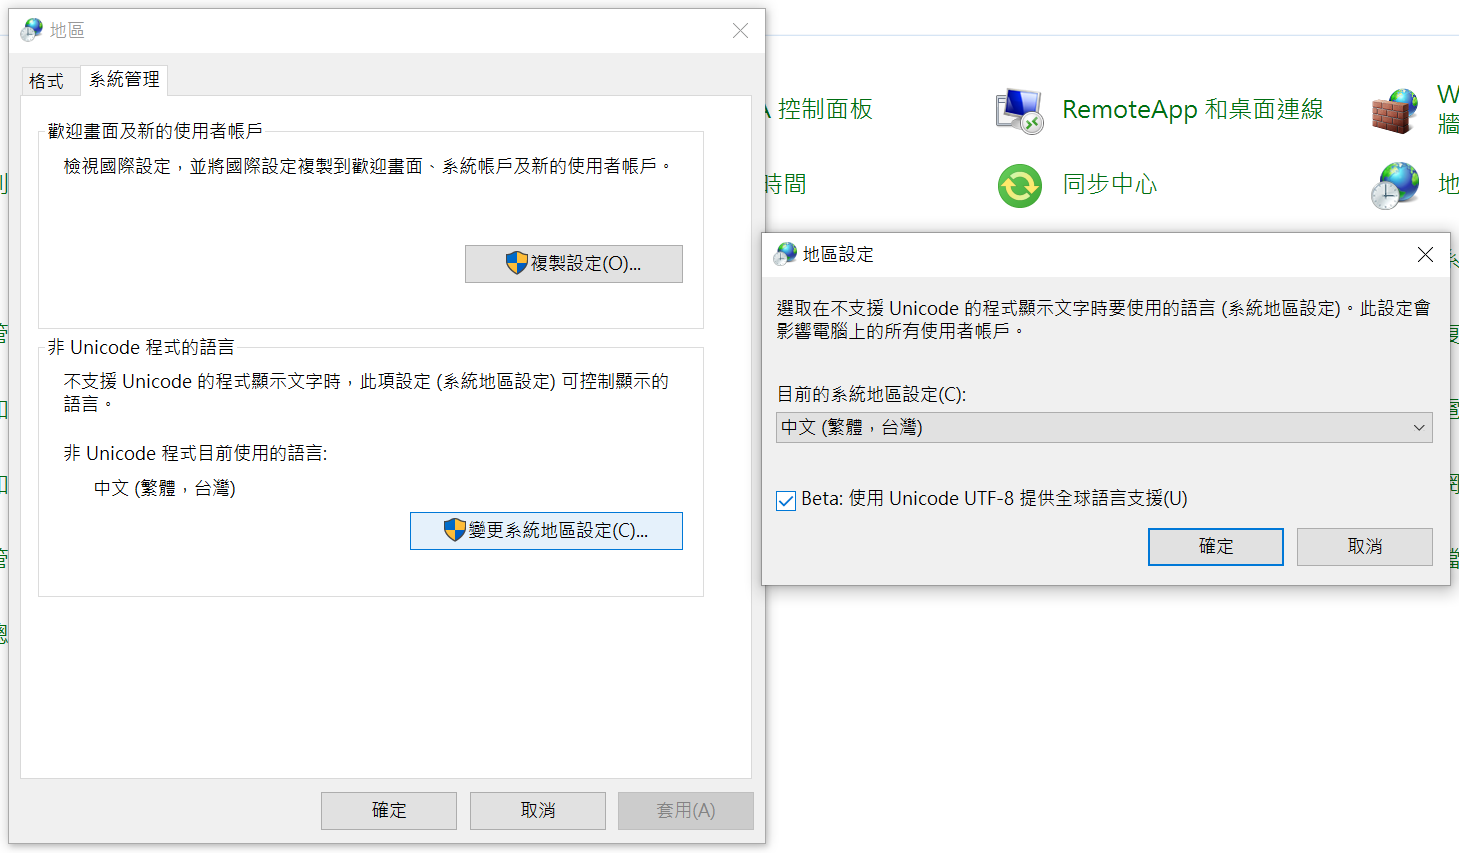
後來發現原因是主控台的預設字碼頁,在中文環境預設下的cp950就只有幾種字型能選,如果切換回65001(UTF-8)就可以選擇其他字型。不過就算切換了字碼,每次重開主控台都會被重置,所以可以直接到電腦控制台開啟下圖的功能解決問題。
ASCII Animation 在有些裝置上不會正常播放,但多試幾次卻可以正常運作
一樣是我在桌機上測試時才發現的問題,在桌機上,有時開啟程式輸入完影片路徑後,程式有正常的跳出播放影片的視窗,也有正確的縮放並調整主控台的設定,但卻沒有開始播放畫面。我猜原因應該跟Signal/Slot有關係,這個問題目前還沒測出來,希望有人有裝置可以嘗試用 Debugger 找找看問題點。
結語
這個組語期末 Project 花的研究時間比想像中久很多,踩到的雷點也很特別,其中學習到的知識特別難得。這還是人生第一次因為開編譯優化(O2)導致程式執行出現問題的。練習使用 Qt、FFmpeg 還有多執行序也是非常難得的經驗,總而言之,花個 40 幾個小時寫這個期末專案絕對值得。